|
Virtual
Indicador de Nivel
How
many times have you been dealing with Level
Indicators that are no longer working or working incorrectly?
Let's see, as usual, causes and
remedies.
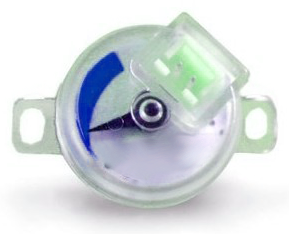
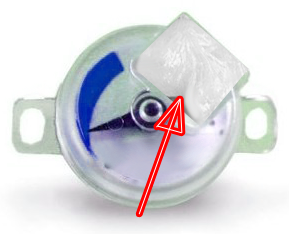
ELECTRICAL MALFUNCTION
The
most common problem that arises is the
lack of sealing both near the Connector,
weak point of this device, and, in rare cases, close to the junction
point between the two transparent plastic half-shells, through which it
is easy for humidity to enter
and the formation of internal condensate, which leads to oxidize the
electric sliding contacts.
In the best quality products, these contacts are also protected with golden plating,
but with the time and the continuous movements combined with inevitable
vibrations, even the hardest plating ends up being consumed, so the
contact oxidizes and is compromised to such an extent that even with
deoxidizer sprays, it is no longer possible to restore the electrical
continuity.
For
the external Indicators,
mounted on the Multivalves, at a short distance away from the road
surface, the problem is even more serious, as they are more exposed
also to heavy sprinkles of rainwater, sprayed by the wheels.
Therefore those Hall Effect
Indicators have
higher reliability, since they are not equipped with a moving Needle
for the Level Reading, and so they are much less subject to the
oxidation phenomenon, since there are no sliding contacts in continuous
motion.
It is true that without the needle the advantage of the direct reading
is missed, but in many cases this reading becomes impractical for the
position of the Multivalve, which makes it very uncomfortable for
observation (under shelves, under screwed covers, below the car,
etc...).
For the most exposed
Indicators, it would therefore be good to protect the connector area
with silicone (that however also loses its effectiveness over time), or
rather it would be better using the vaselina to fully fill the Connector Socket, before plugging in
the small connector.
|
IMPRECISION
Instead, the problems that are often
encountered, even when the Level
Indicator works correctly, from an electrical point of view, are
of a different nature and concern: POOR
PRECISION or TOTALLY WRONG INDICATIONS!
Such
inconveniences are so boring to the point that most drivers, after
a few initial attempts, having realized that the exact amount of Gas in
the tank will unfortunately remain almost always a mystery, no longer
rely on the information coming from the Level Indicator and prefer to
reset the odometer every time, relying to the distance traveled, never
precise because one thing is the miles traveled uphill, one thing the
miles traveled downhill...
Unreliability
comes from several causes:
-
1
- type of Gas: LPG or CNG
-
2
- incorrect indication of the
various quarters of the tank
-
3
- use of toroidal tanks
-
4
- long climbs or descents
1
- Type of Gas: LPG or CNG
Methane,
in contrast to LPG that is in Liquid state, being in the gaseous state,
makes the Level Reading much more reliable and precise, based on the
pressure measurement of the Gas in the tank, which is not subject to
the swings due to Vehicle movement, instead of the floating in LPG
Tanks.
2
- INCORRECT INDICATION OF THE QUARTERS OF THE TANK
It
often happens that, for example, the 4 LEDs of the Commutator Switch
remain lit for so many miles and then 3 LEDs last for only a few
moments, quickly switching to 2 LEDs or directly to Reserve...
The overwhelming majority of the Level
Indicators on the market are almost
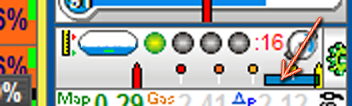
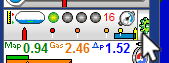
never LINEAR. If you mount an Indicator on a Multivalve and try
to move the float manually, you will notice, observing on the Software
the Blue Color Bar, that it
will move irregularly, which hardly coincide with the Gas Tank Quarters.
To
find a better correlation between the LEDs of the Switch and the Tank
Quarters, which are indicated by the Needle on the Indicator, just move
to the desired location with the mouse pointer, on the Program, the
Colored Circles indicating the various quarters of the Gas Tank.
For example, move the float so that it indicates more than 1 QUARTER
and move the orange circle of the first quarter a little before the
Blue Bar; you will see two lit LEDs.
Note
that you cannot be sure that the position indicated by the Mechanical
Indicator Needle follows exactly the Tank's geometry, which is a
variable (circular) section, and the right position within the Tank. In
fact, a more correct set-up
would require theoretically to proceed as follows:
- fill a quarter of a Gas Tank
- discontinue gas delivery, releasing the Service Station pistol, which
with its pressure would move the float downward
- adjust the relative notch on the Software
- fill in the second quarter
- release the pistol
- and so on... for every quarter...
It's
obviously a pretty long wasting of time, as well as almost useless if
we talk about LPG, that being Liquid will always be in continuous
motion...
On the other hand, the Software allows you to save the work you have
done to benefit from Tanks, Multivalves and Indicators of the same
type, to be reused in the future.
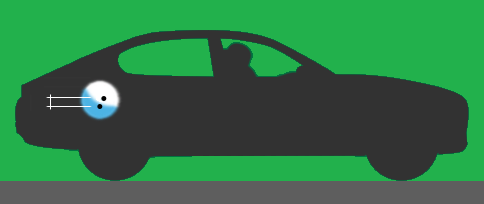
3
- USE OF TOROIDAL TANKS
If
you consider that in a vehicle moving, subject to continuous
acceleration and braking, the position of the LPG in a Toroidal Tank
has about the appearance shown in the following image, with Blue color,
you understand that measuring the amount of Gas in these conditions
it's a chimera, with the float continuously swinging up and down, from
its minimum to maximum position, because a part of the tank is emptied
horizontally.
The
microprocessors of the Gas Control Units perform a reading average,
trying not to be influenced by a continuously unstable position, but
the result, however very appreciable, can not always be considered
accurate.
Cylindrical Tanks, if mounted orthogonally to the direction of travel,
are less prone to swings and have lower floating excursions;
consequently, the reading is definitely more accurate than in a
Toroidal Tank.
4
- LONG CLIMBS OR DESCENTS
Despite
the presence of the Software absorber, in order to mediate the
variations, in the case of prolonged stoppage of the Liquid in the same
position, such as in the long ascending or descending tracts, the
Control Unit is led to errors of assessment from the wrong position of
the float, showing also in this case an incorrect Level.
|
HOW TO SOLVE THE TROUBLES OF THESE LEVEL
INDICATORS?
IS THERE ANY MORE PRECISE INDICATOR, NOT SUBJECT TO CONTINUOUS
VARIATIONS?
The answer is YES, this
indicator exists, it is also inexpensive, and it is:
" THE INDICATOR THAT
THERE IS NOT "
With the new firware version, 6.04
- May 2017, by which you can upgrade all our Units manufactured 16
years ago to today, models:
POWERFUeL, EasySeq, RxPOWERFUeL, PowerEvolution, Evolution,
GasEnergyPower, GasEnergy, K2, Next Generation, we have added
the possibility of Calculating by the
ECU, the amount of Gas Consumed, according to the Opening Times
of the Gas Injectors, RPM, Pressure, Temperature, and so on.
The result is a much more precise VIRTUAL LEVEL INDICATOR.
Let's
take a look at PRO and CONTRO of the VIRTUAL GAUGE.
The advantages are:
- accuracy
in measurement is much higher: one quarter corresponds to a quarter,
Reserve is Reserve, and so on.
- the measurement is no longer related to the movement of the Liquid, braking,
accelerating, climbing or descending
- you can eliminate completely the use of an Indicator, saving not only
the cost of the sensor but also the time for its installation, setup,
maintenance
- if you break a Traditional Indicator, you can avoid replacing it by
using the Virtual Indicator
- if also the Pressure Sensor is broken, or it is not installed, with
the Virtual Indicator it is also possible to perform the self switching
over to Petrol when Gas is finished, WITHOUT USING PRESSURE SENSORS,
further money savings
- it is possible to measure the Gas Level on all those Gas Tanks that
cannot have a Level Indicator such as Tanks for boats, three-wheel vehicles, scooters, etc.
The disadvantages are:
- the need to fill completely the Gas Tank each time, no longer having
a sensor to detect the filling state
-
for the same reason, when the Gas is over, you lose the advantage of
being able to switch back to Gas automatically after a refill.
THE BEST
SOLUTION:
However, in order to avoid the disadvantages and in order to retain
only the advantages of both the Traditional
and the Virtual Indicator, a
good way is to use the two indicators
simultaneously:
in this case the Control Unit will use the Traditional Indicator only
to establish the Level after a Refill and will use the Virtual
Indicator for an accurate measurement.
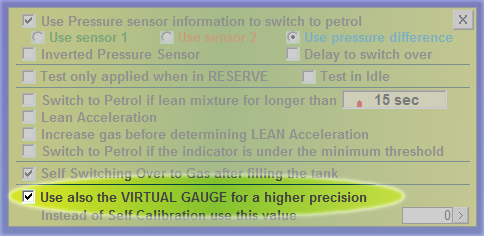
Let's
see how to use the Double (Traditional+Virtual) Indicator:
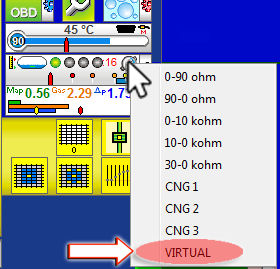
Set the Real Indicator in the normal way
and click on the icon of the Green Gearing to open the Advanced
Settings for the Gauge.
Then select "Use ALSO the VIRTUAL GAUGE".
And the nightmare is over!
|
|
|